Showing posts with label teens. Show all posts

Monday, September 21, 2015

Science Fair Projects

It's that most dreaded time of year again: science fair. My roommate/coworker told me there were kids in this weekend asking for science fair project books.  Which means that soon I'll have to deal with questions like"Where are your books about mascara?" and other such nonsense.  To combat this, help parents and kids understand science fair better, as well as how to research their projects, I came up with a powerpoint presentation that I did for several years.  My internet-fu is not so strong as to let me know how to put the file here for you to download, so instead I'm just putting the text up here for you. Just as good - copy and paste is a wonderful thing. Luckily, this text was all in the handy-dandy handout I made for everyone.

Picking a project:
Make sure you pick something appropriate for your age/grade.  If you pick something beneath your level, make sure you have STELLAR research to go with your project.

Let’s brainstorm:  What are some of your favorite subjects/things?  How can we turn those into a science fair project?

(Interjection not originally in the handout: Really.  Do this. It's a great exercise in creativity. If you have a group of kids, or even if you're just doing this for your own kid, there has got to be a way you can tie science back to an interest of theirs, be it video games, sports, or...boogers.  I don't know! Kids like gross stuff.)

Research:
This is probably the most dreaded part of science fair projects – the research.  But it doesn’t have to be hard if you’re smart about how you do it!

Let’s use an example of testing plant food.  What topics do you think you should research?

If you think you’ll be able to come to the library and find a book about plant foods – specifically the ones you will use, you might as well just beat your head with an encyclopedia – because it will be just as frustrating.

Think about it for a minute.  Why do you think plant food A will do better than plant food B?

The best thing to do in this situation is look at the ingredient list of the two different plant foods.  Is there an ingredient in one that isn’t in the other?

If there is, research that ingredient and its effects on plants.  You can also research the type of plant you will use and see in what growing conditions it does best.  If your plant food is highly acidic/alkaline, you might research that and see if that might affect your plants.

Hypothesis:
Once you have chosen the experiment you want to perform, you have to come up with a hypothesis.  

A hypothesis is a statement in which you tell what you think is going to happen when you perform your experiment.

For example you may do your research and say “I think plant food A will help the plants grow better.”

Materials and Procedure:
What materials do you need to perform your experiment?  For the plant one we need: pots, plants, dirt, water, plant food A, plant food B, sunlight, a ruler and a journal.

How exactly are you going to perform the experiment?  That is what you detail out in the procedure.  

This is how we are going to perform the plant experiment:
1.       Put plant A in a pot with dirt and label.
2.       Put plant B in a pot with dirt and label.
3.       Measure each plant and write down its initial height in the notebook.
4.       Give recommended amount of plant food A to plant A.
5.       Give recommended amount of plant food B to plant B.
6.       Place both plants in sun/shade as needed for type of plant.
7.       Water plants as necessary.
8.       Check back in a week and write down measurements of plants.  Repeat process of feeding plants  for 5 weeks.

Control:
A control is a part of your experiment that does not change.  As you’re starting out, it’s best that most of your elements are “control”.  This is the opposite of a variable – which we’ll talk about in a moment.

A control can also be something you do nothing to.  For example, if you were doing experiments on plant food, the control would be the plant that you only gave water to – no food.  This helps you have a base line on which to compare your data.

Variable:
A variable is a part of your experiment that changes.  In the example of plants, it could be the kind of plant food you’re using or it could be the amount.  However, try to stick to one variable per experiment – at least until you get older.  If you don’t do each of the variables properly, you could mess up the results of your experiment.

But how could that mess it up?

Well, say you were testing different plant foods and amounts, and you gave a lot of plant food A to the first plant, and just a little of plant food B to the second.  If the first plant grows better than the second, what made the difference?  Was it the type of plant food or the amount given?  Because you did both variables at the same time, you can’t really know.

So how do I test multiple variables?

Well, what you could do is get lots of plants.  The first four plants you give plant food A.  Each one gets a different amount.  The second 4 plants get plant food B, with the same amount as the other plants.  That way, you can do a side-by-side comparison of which plant food did the best with which amount of food given.

So what are our controls and what are our variables in this experiment?

Controls: the type of plant used, type and amount of soil used, amount of sunlight, amount of water given, etc.
Variables: type of plant food and amount

Important!
It is very important that when doing your experiment that you keep your controls EXACT.
For example, when you water your plants, make sure it’s all the same water (tap, spring, or distilled) and the same amount.  So if you give a ¼ cup to one plant, make sure you give that same amount to all.  If you don’t measure the water, you may give more water to one plant than the other, and that can affect your results.

Data:
Qualitative vs. Quantitative Data

Qualitative – things you can describe.  As far as the plants go, this is where you could tell if the plants look healthy, wilted, or dead, if they’ve lost any leaves, and if they have good color or any flowers blooming.

Quantitative – these are measurements.  You would put how many inches or centimeters the plants have grown

So which is better?  Either is good, but when doing a science fair project, teachers and judges are usually looking for Quantitative data.  Numbers are great way to prove/disprove your hypothesis

Materials and Procedure :
Remember: When you are doing your board, you have to include what materials and the procedure you used in performing your experiment.  A journal is a good way to keep track of this.

Results and Conclusion:
This is where you summarize what happened in your experiment and draw a conclusion.  For example:  The plants that had plant food A grew .5” taller than those with plant food B.  Plant food A must be the better plant food.

IMPORTANT!
It is OK for your results to be different from your hypothesis.  Sometime things don’t always go the way you expect – that’s why we do science experiments!

IMPORTANT!
For the best results, try to do your experiment several times.  If you do the experiment multiple times, and you get similar results, congratulations!  If you do it multiple times and get different results every time, double check to make sure you did everything the exact same way each time.  It’s ok to have different results, but there should be some consistency after several tries.

Safety
Remember, that you should always take proper safety precautions when doing your experiments.  It never hurts to wear a pair of safety goggles (or barring that – a pair of sunglasses to protect your eyes).
Parents should always supervise or help when knives or other sharp objects are used or when things like the oven or fire or chemicals are involved.
If you think something could be too dangerous – an experiment with firecrackers – don’t do it.  Try to use common sense.  It should help you out most times.

Resources
How-tos/Ideas for projects:

Monday, September 14, 2015

Teens Craft Project: Hula Hoops

Every summer I try to have at least one major project that I know will blow them away.  It's really hard to predict my numbers, and that's why I plan for one major one. Sometimes my attendance is as low as 2 - and it's not that we don't do something fun, I just have to save the super-awesome stuff for the big days.

So summer before last I found a tutorial on making your own hula-hoops, and I thought, "I'm going to do that with my teens!" It really is simple to make.  The hardest part is gathering all the supplies.  The second hardest part is the wait the teens had because I had to help them one at a time, so they played Apples to Apples while they waited.

When I started researching this, I found all sorts of stuff. Like about calculating hoop size for your body. We did the standard to the top of your hip - which let me tell you, made all the difference for me.  I'm 6' and *cough* pounds.  Ok, I'm not a small girl - and as such, I need a much bigger hoop!  Makes sense, right?  Once I made it and tried it out, I did so much better than I ever had!  I've never been able to hula-hoop!  It was great!

I didn't have a whole lot of options for decoration in my small town, so I just bought a bunch of different colored electrical tape and let the teens go to town.  Once everyone's hoops were made, the decoration part definitely took some time.  As far as I can tell, everyone loved the craft.

Warning: this is obviously not a cheap program to do.  You *could* charge a few bucks for this program if you needed to, or just even it out by doing other less expensive programs for awhile. Truth be told, I probably spent about $100+ for about 12 teens or so.  Would I trade it for the world?  Never.

Thursday, September 3, 2015

Teen Cooking Program - Easter

This is a major throwback to a program I did over a year ago.  It was in April of 2014, in fact.  I think this was before I decided to do a Chopped program with them.  In fact, this may have been what kicked off that idea.  I'm not sure.  Anyways, with Easter coming up, and me not necessarily wanting to do an egg-dying program, we came up with something else.  

The teens were going to make their own deviled eggs.  Rather than me tell them how to make them though, I just set out a bunch of ingredients and let them come up with their own recipes.  It was an adventure to say the least.

I cooked the eggs at home, and made about 4 dozen or so. Then I gave them mayo, mustard, relish, wasabi, soy sauce, sriracha, bacon bits, scallions, chives... there may have been more, but I really can't remember right now. Then I just let them go to town. There were only 4 of them, and in the end, I wanted everyone to try everyone else's.

While they were busy making theirs, I had my own recipes, one of which is a delicious wasabi and sriracha egg, found here.When it came time to taste them, they were not too thrilled with my eggs. In fact, I'm pretty sure some refused to try them.  Their parents liked it.  I guess pearls, swine, blah, blah, blah. I *think* the other was just the standard - mayo, mustard, relish.

You can see that some had a little trouble with ratio of ingredients and had a different way of cutting their eggs.  Others certainly kept plating in mind while working on their recipes.  They all had fun, and we ate a TON of deviled eggs that day.

This is a great way to do a cooking program without *really* doing a cooking program.  It lets them be creative too, without going too far out of the box.  I suppose I could have given them things like anchovies and olives and things like that, but I do have budget constraints, and at the end of the day, I did want them to actually eat whatever they came up with. There will be more teen posts, I'm just having trouble finding pictures, and this is the first one I ran across.

Thursday, August 13, 2015

Box of Lies

If you haven't heard of Box of Lies, then HAVE YOU BEEN LIVING UNDER A ROCK?!  Admittedly, I hadn't heard of it until our FLYP training in November, and as far as late-night television goes, yes - I do live under a rock.  I go to bed at 10:30.  The world could end and be resurrected again, and unless it pops up in my FB feed the next morning, I would probably have no idea.  That said, I'm usually pretty good at keeping up with Fallon.  

Anywho- I was getting off topic.  Do yourself a favor and take a few minutes to watch a few of the videos.  Melissa McCarthy and Jennifer Lawrence are good ones, as is Tina Fey - who helped test out the game.  If you're too lazy to go watch those videos (really?), then here's the basics:

1. The contestants sit across from each other at a table, with a barrier blocking them from seeing anything but each other's faces.

2.  They select one of the boxes lined up next to them.

3. They open the box, and then describe the contents of it.  They can choose to tell the truth or lie.

4.  The other contestant has to decide it they are lying or telling the truth.  If the are right, they get the point.  If they are wrong, the other contestant gets it.  They play until someone gets two points.

Sounds easy, right?  Well the thing I love about the show is they put some of the most bizarre things in the boxes!  Rubik's cubes in jello, an egg roll in a bird's nest, a Jane Fonda workout video in a loaf of ciabatta bread.  Stuff like that.  Really easy to trip people up if you tell the truth.  As you'll see in the videos though, sometimes people try to get even crazier with their lies and that's what messes it all up in the end.

SO - I decided to play this with my teens.  I went through my house grabbing all sorts of weird stuff and then raided the library too.  They loved it!  We had things like a lizard puppet wearing mardi gras beads, or two wooden troll dolls and a box of cake mix, a bag full of jellybeans with lip gloss, etc.  The problem was, they wanted to make the boxes, but couldn't do it if they wanted to play again.  I had all my stuff in one box, and then they'd see my stash and know if someone was telling the truth or not if they happened to see it while they were filling a box for someone else.

The next Fallon game I want to try?  Egg Russian Roulette. 

Monday, August 10, 2015

Ocean Trivia Double Dare

This past summer's theme was water, and every year we like to do a trivia game with our tweens. This year was no exception, but to up the ante we decided to bring back an old school game show - Double Dare. Though we didn't have an OCD Marc Summers to host, we weren't deterred and came up with a diabolical game to delight and thrill ourselves (who cares if the kids had fun).

The tweens were split up into two teams. We randomly chose which team went first and began our game. Team A got the first chance to answer the question. If they answered it right, they got full points, if they answered it wrong, they got nothing and Team B had a chance to steal. However, if Team A wasn't sure, they could always dare Team B to answer the question. Team B would then have the chance to answer (for less points) or double dare Team A. Team A could then try to answer (for even less points now) or take the physical challenge.

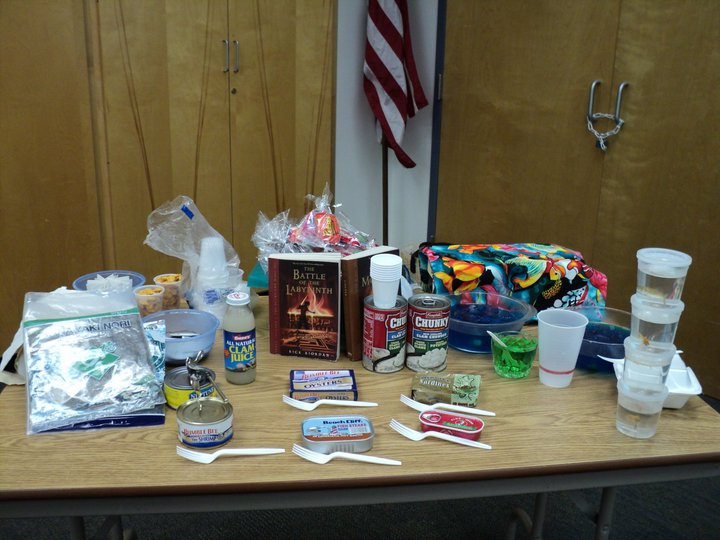
There were two physical challenges they could choose from - an activity or eating a gross food. If they chose gross food, they got more points. Gross foods included nori (sushi seaweed), wakame (seaweed salad), canned clams, clam juice, a goldfish (the cracker - though we didn't tell them that unless they picked it), shots of cold clam chowder, anchovies - I think you get the idea. They had to eat the whole thing (and not puke) to get full points. Activity challenges included searching blindfolded through a bowl of Jello for the shark fruit snacks, playing a round of Charades, hopping around the room on one leg singing the Spongebob Squarepants theme song, etc.

Teams A & B would take turns having first crack at questions until the game was over.  The tweens had a great time - and really?  I don't think anyone was *too* grossed out by the food.  In fact - some of them were asking for more when we were done.  Guess I'll have to get my Schadenfreude somewhere else.

Hunger Games RPG

Well I promised a post about our RPG, so here it is. If any of you aren't already into gaming here's a good tip: find a geeky friend to help you. I LARP and play RPGS, but I was a bit over my head when it came to initial planning of the whole thing. Thankfully, I had my trusted friend Josh to help me out.

While I was waiting for him to come help me with getting character sheets and explaining how to be an ST (storyteller or GM, if you prefer Game Master - since that's what they were called in the books), I took it upon myself to map out my arena and get an idea of what weapons I wanted available to my players. If I had graph paper, I would've used it - instead, I measured and drew the grid. In my head, each square was 1/4 mile, but I don't think that was realistic enough. It probably would've only been 100 ft or so. *shrugs* The great thing about being GM is that if you find things that aren't working, you can spontaneously change them.

The first map is the one that only I could see.
 I mapped out the terrain and any predators, traps, and poisonous animals/plants that I wanted them to run into. This is also the map I used to keep track of where they all were.
In a normal RPG game, all the players are working together - so it doesn't matter if they know where each other are on the map. In this game, since the players were all against each other, I had to come up with a way to keep them from knowing that, hence the second map. See - if this game was "real life", the characters would have NO IDEA where the other people were. For them to look on a map and see would have given them an unfair way to find each other. The second map was totally blank. I don't even know why I gave it to them, except that so they could keep track of where they were in their heads. Pretty much, I showed them where they were to start out, and then when they wanted to move they would tell me "x # of spaces in X direction" (i.e. 3 squares north or 2 squares southwest). I drew a little dot in each space they moved, so I had a little line to help me keep track of things.

I found a list of weapons on a DnD website, and used a lot of those. Things like a spear, a trident, throwing knives, and a bow and a quiver of arrows are all good weapons. Things like firearms are not, as they were not used in the books. Things like +1 damage mean the player gets to roll an additional dice to see if they hit someone.

It's interesting. I ran this game with two very different groups of kids. My teens at the Main library had all read the books, so they were very cautious and strategic about EVERYTHING. My teens at FW hadn't read any of the books, so they dove head-on and even attacked each other during the first game! Awesome! As much as the game is cool because it brings the story to life for the kids, I actually preferred playing with the kids who hadn't read the books yet. Hopefully, playing this game will spur them to do so. I'm thinking about doing an event close to the time of the movie opening in March. I want to get some archery stations set up and show the kids how to do things like camouflage paint and rope-tying - you know, survival skills.


Halloween Crafts


Originally, I had planned on doing this cool glowing necklace for a craft with my teens, but when it came down to the wire, I had forgotten to order the mini 1.5" glowsticks that I needed, and thus ended up having to come up with something to do at the last minute. Here is where I have to confess: I love Martha Stewart. Well, not necessarily her, but all the people that work for her and come up with all the cute ideas in her website/magazine/tv show. Going to her website and browsing around a little totally saved my butt - especially when I found the
fanged pumpkins.

Walmart had these bags of mini pumpkins  - 3 for $3, so I snapped a few of those up.  The pumpkins were a pretty decent size - about 7 inches or so in diameter and about 4 inches tall.  All you have to do is use the template from Martha Stewart to cut out a mouth and then use that opening to thoroughly scrape out the pumpkin.  (The better you can get it scraped out, the longer it will last.  I think I had mine sitting on my computer til at least Thanksgiving.)  Pop in a set of plastic vampire teeth, use some pins for eyes and voila!  A really cute pumpkin that's super-easy.  The ones I did lasted on my desk for quite awhile too.  If I can find it, I'll post the after picture.  It's pretty funny.

The other craft I did was inspired by Martha Stewart, but not taken directly from there. The website had instructions on making a ghost necklace by allowing a blob of glue to dry and then punching a hole in it. At a horror con awhile back, I had seen someone selling latex jewelry and I thought - why not merge the two? So using food coloring, I mixed up a bottle of dark purple and red dye apiece. Using wax paper, I drew out my design for a bracelet. (An easy way to fasten it is to
 draw a loop on one end and an arrow on the other. Pull the arrow through the hole, and the wings of the arrows catch, holding it closed)

From what I remember the teens liked this, but maybe had a little trouble with the bracelets.  Understandable.  Maybe try it with Tacky glue?  The food coloring will thin it some, and you can thin it with a little water if you need to, but maybe if it doesn't run as much, they'll have an easier time.


Tuesday, September 27, 2011

The Hunger Games

If you work for a library, and you don't know what The Hunger Games is, then you are stuck in some sort of time wormhole where it's permanently 2004 (or something). It's a fantastic series written by Suzanne Collins and you really need to check it out. I had heard about it and intended to read it, but didn't get off my butt and do it until a bunch of my adult friends got swept up in the stories.

Now, as a little back story, let me tell you that I am a HUGE geek/nerd. I'm part of a stage-combat group that does the living chessboard at the Hoggetowne Medieval Faire every year. I LOVE Doctor Who and Being Human (esp. the British version). The nerdiest thing of all is that I LARP - that's live action role-playing. If you're really old-school, it's a modified version of Dungeons and Dragons, but without the dice. That's what I do every Friday night (I know, you're jealous).

Now that you know all that, I can tell you that when I read The Hunger Games, I got inspired. What book would make a better RPG than that? For those of you totally unfamiliar with the premise of the book, America has fallen and a new country, Panem, has taken its place. The country is divided into 12 Districts and the Capitol. The distribution of goods is a bit uneven, so some districts are starving, while people in the Capitol drink liquids that make them vomit just so they can eat more at the fancy parties they go to. A long time ago, the districts tried to revolt against the Capitol and lost. As a punishment, every year they have something called The Hunger Games. 2 tributes are sent from each district to fight in an arena battle to the death. The last person standing wins. If they win, their district gets food for a year (the other reason it is called The Hunger Games is that kids can put their names in more times to be drawn in order to get food for their family).

It's pretty messed up and violent (making it one of the top 10 most challenged books of 2009-2010), but at the same time, I figured it would be something the kids would really get into. It will definitely make for a battle-heavy RPG, but I'm still confident the kids will enjoy it. We're using basic character sheets from World of Darkness, and I'm trying to make the dice-rolling as simple as possible. I will put up another post detailing more of my pre-planning as soon as I have it all figured out.

We're not starting this til November, but I have put up signs and posted a sign-up sheet to try to generate some early interest. I'm doing a scavenger hunt for Banned Books Week and decided today to give away a copy of the book to the winner. Not that anyone really reads this, but in case you do - check out your local Walmart this week! When I went to pick up copies of The Hunger Games (which were only $6.25/each), I noticed they had a lot of the banned books for sale i.e. 1984, Catcher in the Rye, Adventure of Huckleberry Finn, etc.

Monday, September 26, 2011

Collaged Notebooks

As it was back-to-school time when my programs started off, I decided to kick off my teen programs with a collaged notebook. It was after the major sales, but Office Max still had some crazy sales going on, and I was able to nab several packs of notebooks (3/pack - only $2)!

This is a really easy craft to do, of course, and it requires very little work on your part! All I do is give them the notebooks, paintbrushes, glue, magazines, and scissors and let them go to town. Note: this may need to be a two-parter b/ it takes a long time to pick and cut out the pictures you want. The kids may have to leave the notebooks behind so they can dry.

For those of you not familiar with collaging, the process is simple. Once you have your pictures cut out, take a small amount of water and add it to some regular, white glue. Paint the glue solution onto the area you want you pic, lay
the picture down, and then do another coat of glue on top of it (this helps seal it in). You can buy official Mod-podge at craft stores, but the glue and water works just as well. The only difficulty I had this go-round was that the glue/water solution wanted to bead up - which is an issue I've never had before. I just kept running my brush over it to spread it out, and eventually it dried alright. If you look at my notebook really closely, you can see where the glue is. I also had a problem with my paper wanting to wrinkle up, but again, I just kept smoothing it out with my brush, and didn't seem to turn out too badly.

The kids really liked it, but they ran out of time. Most of them got their notebooks done, they just had to leave them here to dry.


Banned Books Week

Sometimes these special themed weeks really throw me for a loop, and sometimes they can be really inspiring. This year is the first year I'm really celebrating Banned Books Week with my teens, and I've decided to do a scavenger hunt.

I've done scavenger hunts in the past with my teens. The first one I did, found here, was basically trying to get them familiar with the library (there's a question for each section of books) and how to look for things in some of the books. Mine is just to give you an idea of some things you can do because of course you won't have the same displays or books that my library has. It was a bit difficult, and most of the teens didn't finish. I gave them about 45 minutes to do 25 questions (some of which, I'll admit, were hard), so I decided that for this go-round I need to scale it back a bit. *One cool thing we did though - I had a sheet with the answers printed on it and gave it out to the teens, so they could write a story with the answers. The best story won an iPod Shuffle.*

If you go to the American Library Association's website, you can find lists of banned books listed by author, by decade - and that's what I used to write my scavenger hunt. You can find mine here. Again, you may not have the same books - or even the same editions that I have, so you may have to change some of the questions to suit your library. This is just to give you an idea of what I'm talking about. I haven't done this with my teens yet, but I'm hoping they will have an easier time with this one.

**Update** Did the scavenger hunt yesterday. I had a hard time getting them to scatter and work separately, and they did have a hard time with this one too. They kept complaining that they didn't know where things were, and I told them that this was supposed to teach them how to do that. Before we started, I asked if they knew how to use our catalog computers and they all said yes, so I ley them go - turns out they didn't know as much as they thought (go figure, right?). Afterwards, when I was giving out prizes and telling them about The Hunger Games and the upcoming RPG, they got really excited (yay!). I think I should've told them about that ahead of time to give them that competitive spirit...**

Wednesday, March 9, 2011

Cassette tape wallets

Well after the Tween Programming workshop I attended yesterday, I am riding high on a wave of good feelings and am ready to get back to writing on here! A quick explanation: I went to a workshop yesterday, and before it began I was thumbing through the powerpoint presentation that had been printed out for us. I was quite surprised to find a number of pictures from this very blog on the slideshow! I said something to the presenter, the awesome Kio Fuller, and she told me she loved this blog! Sweet!

So one of my more recent projects that I thought was totally rad are these cassette tape wallets. Now you might be thinking to yourself, "Cassette tapes? Who has those?". Well - have you looked around your library? I had at least a drawer full of these things in my office from back when they would use them during storytime. I only use CDs or mp3s now, so having them around was only a waste of space until (ta-da!) I stumbled across this craft.

Step 1: Get a small screwdriver (like for glasses) and remove the screws
from the cassette. Some cassette tapes are glued together - esp. the professional ones. If you have any that were original bought as blanks, then those are the ones that have screws (and they're also the easiest to use in this case).

Step 2: Once you have the cassette taken apart, remove the magnetic tape from the inside.

Step 3: Take a zipper, preferably 12 inch, and (starting in the middle, where the magnetic tape would be exposed) glue it to the separate cassette sides. If you can't get a 12 inch zipper, a 9 inch one will do, but you'll have to glue some ribbon to the bottom of the wallet (the "bottom" being where you started and ended the zipper). Hot glue works best.

That's a really basic summary of how to do it. I'm not even sure if I had instructions, but really, if you look at the pictures, I think you can see what you're supposed to do.

As far as the reactions from my tweens? Well, I only had one attend the program. That's my biggest problem. I have plenty of cool ideas, but I don't have that many tweens actually show up. Anyways - the one who came really liked it, and when I put it up on my facebook wall, my friends went nuts over it, so I'm sure if you decided to try it at your library, it would be a big hit.

Monday, January 31, 2011

Thai String Dolls

Around Halloween, I decided to try these Thai string dolls that I had seen on another website. There are several different ways to make them. Some have wooden bases, other have wire and still others have string, but the end product is fairly similar. Basically you take your base, and just start wrapping layers and layers of string around to make the limbs and head. I provided some felt so the teens could dress their dolls if they liked, but I think the more successful ones were the ones without clothes.


The teens enjoyed this one, but I think they had a bit of a difficult time with it. Sometimes what they just wrapped would unravel a bit, and they got pretty frustrated with it. To the left are the couple that I made. The top one is supposed to be a zombie Charlie Brown, but it doesn't look quite like I hoped it would. The devil came off very well, I think.

Recycled T-shirt Bags

I've been wanting to do this craft for quite some time. Teen programs can be really expensive after awhile, so during this spring semester, I'm trying to focus on recycled crafts again.

This is probably one of the easiest things you can do with your teens, and cheap too - if you do it right. I went to a local thrift store and picked up a bunch of T-shirts for under $10. At first, I was a little disappointed b/c there didn't seem to be much of a selection of shirts w/cool logos or designs. I then decided to try the kids' section - and cha-ching! Jackpot! Now, these shirts are smaller than the adult (obviously), so you wouldn't be able to use them as a grocery bag like most others I've seen online. However, for a teenage girl, it's the perfect purse-sized bag.

If you want to save money, you can always ask the teens to bring in their own T-shirts. I have found that they tend for forget a lot of things, so you might just save yourself the headache and buy the shirts yourself. The way to make these is super simple - you just cut the sleeves off (leaving the seam intact on the shirt), flip it inside-out, and sew the shirt closed along the hemline. The teens can sew that by hand, and all in all the craft should only take about a 1/2 hour to complete.

My teens really seemed to like this craft. One of my coworkers has a daughter that comes to my program, and she told me the next day that her daughter had taken her bag to school. Success!

Monday, September 20, 2010

Eclipse Party


*sigh* I wish these books had never been made. However, if it gets teens to read, I suppose I can't complain about them too loudly. We had a Twilight party last year in celebration of Edward's birthday (June 20th) - apparently I didn't write about it here. Brief overview of last year then: he had a birthday cake, werewolf kibble, drinks, played a matching quotes game, a trivia game, and a game of chance. We had a ton of prizes, and everyone walked away with something. Fast forward to this year. We had to come up with bigger and better things for this party.

First: We made buttons that said Team Edward and Team Jacob (with corresponding pics, of course), and the teens picked out of a hat and were sorted into the 2 teams.
They could only trade teams if there was someone else on the other team that wanted to trade.

Then: The first game we played was a Bella tug-of-war. (Get it? Because Jacob and Edward fight over her...) Played like a regular game of tug-of war, but we had Bella's pic taped to the middle of the rope. Whichever team pulled her across their line on the floor first won the game. The
winning team each received a New Moon door-hanger. (All of our stuff was New Moon themed b/c it was on clearance at Hot Topic).

Next: We had the teens do a word search. The first to find all of them the fastest won. The winner got to choose from our table of prizes.

Next: Trivia game! The teams had to pick one person to represent them (unfortunately, that person was the only one who could win a prize). The person was pretty much on their own except for they could use a lifeline and ask for help from their team.
Next: Eating contest! The teens competed against members of their own teams! Team Jacob had to eat Reese's Puff cereal out of dog food bowls and Team Edward had to eat cherry Jell-o out of plastic cups - all with their hands behind their backs! I felt a bit bad for Team Jacob - I should've either put less cereal in or at least given them some milk. Team Edward had a hard time, but once they figured out they could tip the cup over and slurp it off the table, that one ended in no time.

Finally: The chance game. This one is called Vampires and Victims, and basically all you have to do is make up a bunch of slips of paper with the words vampire and victim written on them. Count out an even # of each for the # of teens you have, and
then have them go in a circle each pulling out a slip of paper. Anyone who has a slip with "Vampire" moves on, anyone with "Victim" is out. Totally random. Keep going until you end up with only 1 vampire left, and there's your winner.

We still had prizes after all that, so we just started drawing names and giving out prizes until they were all gone. We didn't have enough for everyone to have a prize this time, but I think they all had a good time regardless.

Boat Building Competiton


This was the project we used to kick-off our summer teen programming. It's a great one if you need something to just throw together because all you have to do is gather a bit of odds and ends and see what they can make out of it. Items we used included:

water bottles
egg cartons
aluminum foil
Ivory soap
cork
paper clips
balloons
duct tape
straws
pint fruit baskets

They had half an hour to make a boat (we also provided Goldfish
and blue Hawaiian Punch during that time), after which we tested it's buoyancy by submerging it in a large plastic container filled with water. We judged boats on looks, buoyancy, and motility and then awarded certificates to the winners. I think the teens had a good time with this, though I didn't see too many of the boys after this one. Weird.

Cupcake Decorating

You may remember that awhile back I did a post on the cake decorating we did last summer. Big hit. Big mess. Tons o'fun - for the teens at least. Well we did it again (sort of) this summer.

Originally, the idea had been brought to me by my literacy coordinator. A couple of the women on the Friends board are cake decorators and wanted to do a program with the teens. I was given the impression this would be a program every week, and I said ok. Well, come to find out later they wanted it to only be a one-time deal, and they wanted to limit the # of kids.
Again, I was ok with this - limiting the # totally made sense. So I made a sign up sheet, limited it to 15 and made up some signs as well as put it on the fliers we sent to the schools. The response was incredible! We were filled up in no time, but I had people write down the names of anyone interested so that perhaps I could persuade the women to at the very least do a second class for anyone on the list.

The day of the class got closer, the women had everything planned out, and then the day before (or possibly the day of - I don't remember) - both women fell ill. I completely understood - we set the date for the next Tuesday, and I called all the teens and told them of the change in days. Well later that day, she called me back saying she'd have to move it because her partner would be out of town that day. I told her that I had already called all the teens and so she agreed to still have it that day after I assured her she'd have plenty of help from our children's staff and our volunteers.

The day before the program rolled around again, and she had to call and cancel because she'd been in the hospital that weekend. Apparently I wasn't caring enough, because I found out later that she was upset with me, but I assured her everything was ok, and I understood that she had been in the hospital, but I was already trying to problem-solve in my brain, so maybe th
at's why I came off cold. I talked to the director, and decided to do the cupcake decorating program myself . There was no way I was calling those teens back to cancel a second time without being able to give them a definite date for the future!

So I called Publix, and they were willing to sell me unfrosted cupcakes by the pound. I grabbed the two awesome cupcake books we had on our shelves, Hello Cupcake and What's New, Cupcake? by Karen Tack and Alan Richardson and went shopping for supplies. We decided to make koi fish out of circus peanuts and roses out of orange slices (both of which are in the books), because they seemed the simplest. I called all the teens on the list (about 30) and invited them all to come - after all, these were relatively simple, I was going to have a lot of help, so why not do them all at once? The teens had a great time (all girls, I believe), and some even got to do a few extras because we had some no-shows. It was a little last minute, but a great success and something I would recommend to any library that has those books!

Wednesday, March 31, 2010

Dyed Easter Eggs


So I didn't last the entire month doing teen tech stuff. Honestly, I kinda forgot there were more than 4 Tuesdays this month, and so I didn't plan as far enough ahead as I should have. However, with Easter coming up this Sunday, it wasn't hard to figure out what to do with them. Everyone loved dyeing eggs, don't they? One of my coworkers directed me to Martha Stewart's website where she has tons of different ways to decorate eggs.


The first way, (and not found on Martha's site) is of the hippie tie-dyed variety. You can find those tie-dye egg kits at the supermarket, but I wasn't really satisfied with the way they do it. The kit that I bought had you putting the dye on, but then rubbing it around to make it look tie-dyed. Lame. So I searched online and found some hints. If you dip a paper towel in a water and vinegar solution, wrap it around the egg, and then drop the color onto the towel, the colors bleed and have a much more realistic effect. When done with your design, take the paper towel off and let the egg dry.

The second technique is marbleizing. Basically, you dye the egg in a light color and let dry. Then, make another darker colored dye in a shallow pan and swirl a bit of oil in it. Take the egg and roll it once through the oil and dye and then pat dry! Easy as pie!

The third (and coolest) technique we used was silk tie-dyeing. You can go to Martha Stewart to get the tutorial. The basics are this: Blow out the eggs (Idk why she doesn't say this, but why put all this work into something so beautiful just to have it destroyed?). Take the egg and wrap it in the silk. Wrap that in a bit of white cloth and secure with string or a rubber band. Pop into boiling water for 20 minutes. Take out, unwrap, and presto! Beautiful eggs. The blue one on the right was made with a singe piece of silk - the white parts are where the fabric creased and it didn't touch. The bottom two on the right were made using several ties (the skinny end) and wrapping it around the egg.

How did the teens like this? Disappointingly, I only had one come today. However, with Spring Break looming this weekend, it's to be expected. My girl really liked dyeing the eggs, though she wasn't too interested in the marbleizing or the silk ties. However, after she saw the results of mine, she wanted to do one. Luckily we had just enough time that she could, but seriously? I kinda wanted to strangle her. All in all it's been good so far - and hey, after blowing out a dozen eggs for my teens to use, I've now got enough quiche to last a week.

Tuesday, March 30, 2010

Teen Tech Month: Week 4


This week's project: felt iPod/mp3 player/cell phone covers! I was super psyched for this one, but was a little underwhelmed by the response I got. My first group wanted to make them, but maybe had a bit of trouble in the execution.

I set out paper and card stock so they could sketch and make templates before they cut (thereby saving tons of felt being wasted by making wrong cuts or drawing directly on the felt and not liking the design and scrapping it). I told them what it was for, but they didn't listen. I had one girl place her design smack dab in the middle of the felt and cut it. Alright, I didn't clarify that ahead of time, so I corrected her - no problem - except on of my other girls wasn't listening and not only drew a design in the middle directly on the felt, but she messed it up and had to draw another - again, in the middle of the felt. This might normally not really be an issue, but with these holders, it takes a lot of felt from one sheet to make, so she rendered that sheet useless for that purpose. This was a day for banging my head against a wall. (To make envelopes- just take a long sheet of felt, width a little larger than your iPod, fold in half, and glue along two sides)

The first girl (who is also the youngest - she's 10), kept saying she didn't know how to do it, and was just in general not trying very hard at all. I had to hold her hand through the entire thing. Then my kid who's, well, special came and since he doesn't have an iPod and wouldn't know the first thing on how to make much of anything, I started cutting out a finger puppet for him. After I was done with his, I thought it was really cute, so I made a Domo puppet for myself. (Domo finger puppet not pictured b/c I don't know what happened to him). It was a difficult program, and I wasn't looking forward to Thursday.

Thursday crowd didn't really want to make iPod covers either. I suspect this has more to do with their ludicrous idea that any thing Apple makes is junk, rather than lack of wanting to craft. I took out my Domo finger puppet and showed it to them, and some of them got on board. One kid made a whole set of Teenage Mutant Ninja Turtles (really basic, stylized puppets, but cool). Once they got started, they really got into making them. I decided to to Spongebob and I think he came out quite nicely.

I guess you really have to know your audience for this one. If your teens are as obsessed with their iPods as I am, this is probably a good project - otherwise I'd skip it. I searched a lot online for a great assortment of felt colors, but for the most part I wasn't satisfied until I found Felt-O-Rama. They have a great variety pack of recycled eco-felt for only $15. I used Liquid Stitch to hold together, but it takes a long time to dry (and teens are often impatient), so I would use a hot glue gun instead.

Tuesday, March 23, 2010

Teen Tech Month: Part 3

Just so you're not wondering what happened - we played video games. I don't have pics, and since I already covered gaming in another post, I won't really talk about it much here.

I did discover an awesome game that one of my teens brought - Mortal Kombat vs. DC Comics. Sweet! They had a great time watching the Joker's bizarre moves and antics. I suppose there could be some debate, as this game was probably rated M for Mature, but I'm fairly certain they're all above 16 at least I wasn't too worried. I did stop them from playing one of the other games they had brought that was a lot worse.

Wednesday, March 10, 2010

Teen Tech Month: Part 2


For our second week we did the most low-tech thing possible: video game sprites. I still counted it though, as we were making video game characters. For a more detailed explanation on how to make them, you can read my post called 8 -bit love, or go to the4yablog.com. She's got a pdf you can download and everything. Be forewarned that one of the links, for smashworldforum or something like that doesn't work anymore, and though I tried finding the emblems on their new forums, I couldn't.
********************************************************
Never fear! I searched tirelessly and found a couple of other great links! There's a bead sprites forum full of people doing this very same thing. Great resource for pictures. All you have to do it use their designs and count the beads, and voila! Sprite recreated! The other is and 8-bit gallery on devianart. I couldn't print out the pics, but if you have a laptop, you can always pull up the site and use that for a reference while you're crafting. I'm so inspired, I think I'm going to make a set of Mario magnets for a couple of friends who are getting married (don't worry - I'm getting them a gift card too).
******************************************************
So far, these things have been a hit, and the teens have made some really amazing stuff. One of my girls did a Sailor Moon character (she changed the colors) that looked amazing. Unfortunately, she finished late and I was cleaning and didn't get a picture of it before she left. so far the consensus seems to be that they can't wait to do it again. This is definitely a program I will use over and over again.