Monday, September 20, 2010

Eclipse Party


*sigh* I wish these books had never been made. However, if it gets teens to read, I suppose I can't complain about them too loudly. We had a Twilight party last year in celebration of Edward's birthday (June 20th) - apparently I didn't write about it here. Brief overview of last year then: he had a birthday cake, werewolf kibble, drinks, played a matching quotes game, a trivia game, and a game of chance. We had a ton of prizes, and everyone walked away with something. Fast forward to this year. We had to come up with bigger and better things for this party.

First: We made buttons that said Team Edward and Team Jacob (with corresponding pics, of course), and the teens picked out of a hat and were sorted into the 2 teams.
They could only trade teams if there was someone else on the other team that wanted to trade.

Then: The first game we played was a Bella tug-of-war. (Get it? Because Jacob and Edward fight over her...) Played like a regular game of tug-of war, but we had Bella's pic taped to the middle of the rope. Whichever team pulled her across their line on the floor first won the game. The
winning team each received a New Moon door-hanger. (All of our stuff was New Moon themed b/c it was on clearance at Hot Topic).

Next: We had the teens do a word search. The first to find all of them the fastest won. The winner got to choose from our table of prizes.

Next: Trivia game! The teams had to pick one person to represent them (unfortunately, that person was the only one who could win a prize). The person was pretty much on their own except for they could use a lifeline and ask for help from their team.
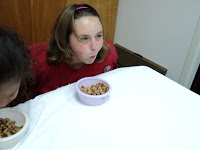
Next: Eating contest! The teens competed against members of their own teams! Team Jacob had to eat Reese's Puff cereal out of dog food bowls and Team Edward had to eat cherry Jell-o out of plastic cups - all with their hands behind their backs! I felt a bit bad for Team Jacob - I should've either put less cereal in or at least given them some milk. Team Edward had a hard time, but once they figured out they could tip the cup over and slurp it off the table, that one ended in no time.

Finally: The chance game. This one is called Vampires and Victims, and basically all you have to do is make up a bunch of slips of paper with the words vampire and victim written on them. Count out an even # of each for the # of teens you have, and
then have them go in a circle each pulling out a slip of paper. Anyone who has a slip with "Vampire" moves on, anyone with "Victim" is out. Totally random. Keep going until you end up with only 1 vampire left, and there's your winner.

We still had prizes after all that, so we just started drawing names and giving out prizes until they were all gone. We didn't have enough for everyone to have a prize this time, but I think they all had a good time regardless.

Boat Building Competiton


This was the project we used to kick-off our summer teen programming. It's a great one if you need something to just throw together because all you have to do is gather a bit of odds and ends and see what they can make out of it. Items we used included:

water bottles
egg cartons
aluminum foil
Ivory soap
cork
paper clips
balloons
duct tape
straws
pint fruit baskets

They had half an hour to make a boat (we also provided Goldfish
and blue Hawaiian Punch during that time), after which we tested it's buoyancy by submerging it in a large plastic container filled with water. We judged boats on looks, buoyancy, and motility and then awarded certificates to the winners. I think the teens had a good time with this, though I didn't see too many of the boys after this one. Weird.

Cupcake Decorating

You may remember that awhile back I did a post on the cake decorating we did last summer. Big hit. Big mess. Tons o'fun - for the teens at least. Well we did it again (sort of) this summer.

Originally, the idea had been brought to me by my literacy coordinator. A couple of the women on the Friends board are cake decorators and wanted to do a program with the teens. I was given the impression this would be a program every week, and I said ok. Well, come to find out later they wanted it to only be a one-time deal, and they wanted to limit the # of kids.
Again, I was ok with this - limiting the # totally made sense. So I made a sign up sheet, limited it to 15 and made up some signs as well as put it on the fliers we sent to the schools. The response was incredible! We were filled up in no time, but I had people write down the names of anyone interested so that perhaps I could persuade the women to at the very least do a second class for anyone on the list.

The day of the class got closer, the women had everything planned out, and then the day before (or possibly the day of - I don't remember) - both women fell ill. I completely understood - we set the date for the next Tuesday, and I called all the teens and told them of the change in days. Well later that day, she called me back saying she'd have to move it because her partner would be out of town that day. I told her that I had already called all the teens and so she agreed to still have it that day after I assured her she'd have plenty of help from our children's staff and our volunteers.

The day before the program rolled around again, and she had to call and cancel because she'd been in the hospital that weekend. Apparently I wasn't caring enough, because I found out later that she was upset with me, but I assured her everything was ok, and I understood that she had been in the hospital, but I was already trying to problem-solve in my brain, so maybe th
at's why I came off cold. I talked to the director, and decided to do the cupcake decorating program myself . There was no way I was calling those teens back to cancel a second time without being able to give them a definite date for the future!

So I called Publix, and they were willing to sell me unfrosted cupcakes by the pound. I grabbed the two awesome cupcake books we had on our shelves, Hello Cupcake and What's New, Cupcake? by Karen Tack and Alan Richardson and went shopping for supplies. We decided to make koi fish out of circus peanuts and roses out of orange slices (both of which are in the books), because they seemed the simplest. I called all the teens on the list (about 30) and invited them all to come - after all, these were relatively simple, I was going to have a lot of help, so why not do them all at once? The teens had a great time (all girls, I believe), and some even got to do a few extras because we had some no-shows. It was a little last minute, but a great success and something I would recommend to any library that has those books!

Bath Jellies and Bombs


So - now that I've gotten back into the swing of things, it's time to catch up on summer.

Bath jelly!
I had never heard of that stuff until a couple of years ago, when I went into a LUSH store for the first time. Never heard of it either? It's basically a gelatin soap. Well at some point in time this summer, I was in a scramble for something to do with my teens, when I stumbled across a recipe for bath jelly. (I was actually looking for a craft to do with school age - they were my test subjects) The recipe is as follows:

1 pkg unflavored gelatin
1/2 c liquid soap
3/4 c hot water
food coloring
scented essential oils

Empty gelatin packet in bowl and add hot water. Stir until gelatin is dissolved and add the liquid soap. Also add any food coloring and essential oil (if desired). Stir gently (so you don't create too many bubbles) and then pour into a container. In the stores it looks like the jelly's been made in large pans and cut into chunks. In this recipe you can just pour it straight into a baby food jar or a plastic container. As long as it's kept cool, it should last for awhile. (I think I've had the one sitting in my office for well over 2 months now). If you see any mould, you should obviously throw it away. I used a pink grapefruit scented grapeseed oil that was leftover from the bath bombs we made at Christmas, which was great because there are a number of grapefruit scented soaps on the market.

But we didn't stop there, no! We also made bath bombs. As I just mentioned, we had actually done this craft before at Christmas. The bath jellies hardly took any time to make, and we had a lot of the supplies leftover from the last time, so I decided to add this to the lot. This craft is a little harder, and takes some supplies that needed to be specially ordered. Here is a basic recipe:

2 parts baking soda
1 part citric acid
1 part cornstarch
essential oil
food coloring
water

The whole process of making a bath bomb is very much dependent on how things feel. Basically, you mix the dry ingredients (set a bit aside for an emergency stash), then add just a couple of drops of food coloring. The mixture will fizz but just mix it in as best you can. Add a teaspoon of oil for scent and continue mixing. Then to add the water. You want to add the most minute amounts that you can b/c if you add too much, the bomb won't set correctly. As you add water, you'll want to mix with your fingers, and you'll know it's perfect when you can squeeze your mixture and it will hold it's shape. Pack it into a mold, turn the mold out onto some cardboard and leave it to dry for 24 hrs. If your mixture was too dry, the mold will fall apart (but you can always add water and remold) - too wet, and it will grow - the bomb will be soft and bubbly and bigger than when you first turned it out (add the emergency dry mix and re-mold). There are guides you can find online that are a lot more detailed than this, but I figured this is a good overview.

The teens LOVED this. It's a bit precise, so you really have to watch out and help them, but it's cool because they can personalize it with the scents and colors they want. We did it at Christmas the first time because they make great gifts, but it's also a great craft to do anytime.

Recycled Picture Frames

Sorry about the hiatus folks, the summer was pretty hectic and I honestly forgot about this blog until just yesterday. However - I am excited to be writing again and sharing the cool stuff we've done with other people. Our first teen programs of the school year were this week, and we started them off by making picture frames out of recycled library cards. Why we have all these cards from other libraries, I'm not sure. We got new cards awhile back, so these must have been sent as samples, but I won't look a gift horse in the mouth. It's always nice to do recycled crafts - so cheap!

All you have to do is cut the cards up and glue them on to a frame. We have a frame die for our Accucut machine and we get mat board donated from a nearby
framery, so that was no cost to us either. I'm sure other picture frames would work well, we were just going with what we've got. The first one I did, I tried to do even sized squares (top right pic), but I think I like having all the different sizes better. The few kids that showed up really liked it (this first one wasn't really well advertised), and I think I'll use it again in the future.

Stay tuned - I'm going to try to catch up on the last few months that I missed!


Wednesday, March 31, 2010

Dyed Easter Eggs


So I didn't last the entire month doing teen tech stuff. Honestly, I kinda forgot there were more than 4 Tuesdays this month, and so I didn't plan as far enough ahead as I should have. However, with Easter coming up this Sunday, it wasn't hard to figure out what to do with them. Everyone loved dyeing eggs, don't they? One of my coworkers directed me to Martha Stewart's website where she has tons of different ways to decorate eggs.


The first way, (and not found on Martha's site) is of the hippie tie-dyed variety. You can find those tie-dye egg kits at the supermarket, but I wasn't really satisfied with the way they do it. The kit that I bought had you putting the dye on, but then rubbing it around to make it look tie-dyed. Lame. So I searched online and found some hints. If you dip a paper towel in a water and vinegar solution, wrap it around the egg, and then drop the color onto the towel, the colors bleed and have a much more realistic effect. When done with your design, take the paper towel off and let the egg dry.

The second technique is marbleizing. Basically, you dye the egg in a light color and let dry. Then, make another darker colored dye in a shallow pan and swirl a bit of oil in it. Take the egg and roll it once through the oil and dye and then pat dry! Easy as pie!

The third (and coolest) technique we used was silk tie-dyeing. You can go to Martha Stewart to get the tutorial. The basics are this: Blow out the eggs (Idk why she doesn't say this, but why put all this work into something so beautiful just to have it destroyed?). Take the egg and wrap it in the silk. Wrap that in a bit of white cloth and secure with string or a rubber band. Pop into boiling water for 20 minutes. Take out, unwrap, and presto! Beautiful eggs. The blue one on the right was made with a singe piece of silk - the white parts are where the fabric creased and it didn't touch. The bottom two on the right were made using several ties (the skinny end) and wrapping it around the egg.

How did the teens like this? Disappointingly, I only had one come today. However, with Spring Break looming this weekend, it's to be expected. My girl really liked dyeing the eggs, though she wasn't too interested in the marbleizing or the silk ties. However, after she saw the results of mine, she wanted to do one. Luckily we had just enough time that she could, but seriously? I kinda wanted to strangle her. All in all it's been good so far - and hey, after blowing out a dozen eggs for my teens to use, I've now got enough quiche to last a week.

Tuesday, March 30, 2010

Teen Tech Month: Week 4


This week's project: felt iPod/mp3 player/cell phone covers! I was super psyched for this one, but was a little underwhelmed by the response I got. My first group wanted to make them, but maybe had a bit of trouble in the execution.

I set out paper and card stock so they could sketch and make templates before they cut (thereby saving tons of felt being wasted by making wrong cuts or drawing directly on the felt and not liking the design and scrapping it). I told them what it was for, but they didn't listen. I had one girl place her design smack dab in the middle of the felt and cut it. Alright, I didn't clarify that ahead of time, so I corrected her - no problem - except on of my other girls wasn't listening and not only drew a design in the middle directly on the felt, but she messed it up and had to draw another - again, in the middle of the felt. This might normally not really be an issue, but with these holders, it takes a lot of felt from one sheet to make, so she rendered that sheet useless for that purpose. This was a day for banging my head against a wall. (To make envelopes- just take a long sheet of felt, width a little larger than your iPod, fold in half, and glue along two sides)

The first girl (who is also the youngest - she's 10), kept saying she didn't know how to do it, and was just in general not trying very hard at all. I had to hold her hand through the entire thing. Then my kid who's, well, special came and since he doesn't have an iPod and wouldn't know the first thing on how to make much of anything, I started cutting out a finger puppet for him. After I was done with his, I thought it was really cute, so I made a Domo puppet for myself. (Domo finger puppet not pictured b/c I don't know what happened to him). It was a difficult program, and I wasn't looking forward to Thursday.

Thursday crowd didn't really want to make iPod covers either. I suspect this has more to do with their ludicrous idea that any thing Apple makes is junk, rather than lack of wanting to craft. I took out my Domo finger puppet and showed it to them, and some of them got on board. One kid made a whole set of Teenage Mutant Ninja Turtles (really basic, stylized puppets, but cool). Once they got started, they really got into making them. I decided to to Spongebob and I think he came out quite nicely.

I guess you really have to know your audience for this one. If your teens are as obsessed with their iPods as I am, this is probably a good project - otherwise I'd skip it. I searched a lot online for a great assortment of felt colors, but for the most part I wasn't satisfied until I found Felt-O-Rama. They have a great variety pack of recycled eco-felt for only $15. I used Liquid Stitch to hold together, but it takes a long time to dry (and teens are often impatient), so I would use a hot glue gun instead.